STEP 1 Import Your Members (Contacts)
STEP 2 Profile Settings and Setting Up Reward Earnings
STEP 3 Add a Reward
STEP 4 Send an Announcement
STEP 5 Learn About Promotions
STEP 6 Activate a Cruise Control Campaign
STEP 7 Activate a Rewards Kiosk
Import Your Members (Contacts)
Your members are the heart of your organization. Keep in touch with them and set them up into your Tab King Rewards account so you will be able to send them announcements via text, promotions, and automated messages.
- Prepare a file with a list of your members or download and fill out our Excel Template. Ideally, your file will include the following columns:
- Phone Number
- First Name
- Last Name
- Birthday
- In the Members section, select Import Members and Upload your file.
- Select which columns contain your members' details.
- Review the data and click Import.
Profile Settings and Setting Up Reward Earnings
In your profile settings, most of your account details will already be set up for you. However, you will need to update how many points a member receives when they check-in at your Kiosk or Tablet. Your members will use the points they earn to redeem rewards at a later time.
To update how many points a member receives:
- Go to the Profile tab and select Settings.
- Update the Activity Settings Section with how many points you would like your member to earn each day.
- Select Save Changes.
Add a Reward
Once you have enabled the ability to earn rewards by checking in to the Rewards Kiosk, your members will be able to collect reward points every time they visit. Once they have enough points, they can use the points to collect available rewards.
Depending on what you offer your members, examples of a Reward to offer include:
- Free Appetizer or Snack
- Free Beverage
- Free Apparel
- Discount on goods or services offered
To add your first reward:
- Go to the Rewards tab and select Add Reward.
- Add Reward Name.
Example: One Free Beverage - Add Points Cost.
Example: 10 Points - Select Save.
With the example above, if a customer earns 1 point per check-in, it would take them 10 check-ins to be able to redeem the free drink.
For more details please see: Creating and Managing Rewards
Send an Announcement
Now, this is where it gets exciting. With Tab King Rewards, you can send text messages to your members to send them important information. Let them know the details of the next meeting or wish them a happy 4th of July!
Follow the steps below to create an announcement. You can also send yourself a test message if you would like by selecting
- On the lefthand side of the screen, under Campaigns, select Announcements.
- Click on the Create Announcement Button.
- Under Groups, select which groups you would like your message to go to. Select "All" to send to all contacts in your database.
See How to Create or Edit a Custom Group. - Under Announcement, type out the message you would like to send out.
A preview of the message will be displayed for you to see.
Note: Your account name will always be at the beginning of your text message. - Under Sending Options, you can choose to Send Immediately or to Send Later.
- If you decide to Send Later, select which Date and Time you would like to send your message.
- Click on the Send Announcement Button and complete sending your message or select Send Test to send the phone number in the Profile Section a test message.
For more details please see: Schedule and Send an Announcement
Learn About Promotions
Promotions are limited-time discounts and offers for your loyal members and customers. Once you create or schedule a promotion, a text message will be sent to your database with details of the offer. When your members or customers check in to the Rewards Kiosk, any active promotions will be displayed on their screen.
Creating a Promotion
- On the lefthand side of the screen, under Campaigns, select Promotions to access the promotions screen.
- Select the Create Promotion Button.
- Under Groups, select which groups you would like to offer the promotion to. Select "All" to send to all contacts in your database.
See How to Create or Edit a Custom Group. - Enter the Details of the promotion under Your Promotional Message.
- What's the promotional offer? Include restrictions if any.
This content will be displayed to the customer on the Rewards Kiosk, and the cashier if you use the Tab King POS System. - What's the occasion?
This content will be displayed to the customer only through text message and will not be displayed on the Tab King POS System.
- What's the promotional offer? Include restrictions if any.
- Enter the date and time range you would like the promotion to be active under Promotion Dates.
- A preview of the message will be displayed for you to see.
Note: Your account name will always be at the beginning of your text message. - You can choose to Send Immediately or Sent Later.
- If you decide to Send Later, select which Date and Time you would like to send your message.
- Select the Send Promotion button to send out or schedule out your promotion.
For more details please see: Creating and Managing Promotions
Activate a Cruise Control Campaign
Cruise Control Campaigns are system-generated, automated marketing campaigns that help get your members and customers back in the door more often. Once you set up and make a campaign active it will automatically send out messages and rewards to your customers. While rules are created by the system, there are still some aspects that you can modify and customize to your needs.
- On the lefthand side of the screen, under Campaigns, select Cruise Control to view and manage Active and Inactive campaigns.
- For the campaign you would like to manage, select Edit under Actions.
- Make any editable changes you would like to make to the promotion. For all promotions be sure to include the reward that will be sent out in the message to the customer as well as the expiration date of the reward.
- Set the Status to Inactive or Active.
- Select Save Changes.
For more details please see: Managing Cruise Control Campaigns
Activate a Rewards Kiosk
The Tab King Rewards Kiosk is where you members will be able to check in when visiting and is the start of their experience. Once checked in, they will be able to earn points and see available rewards and promotions.
Downloading and installing the Tab King Rewards Kiosk Application will turn most android tablets into your membership Kiosk. If you already have a tablet that you would like to use, you can go ahead and download the application.
If you do not have a tablet:
- You can purchase the Tab King Rewards Kiosk from the Tab King Hardware Store or
- If you would like to go with a smaller option, you can go with something like the Samsung Galaxy Tab A.
Once you are ready with a tablet, follow the instructions below:
- Download the Tab King Rewards Application to your tablet from the Google Play Store or directly from our website at tabkingusa.com/rewards-app.
-
Open the Tab King Rewards app and get your Activation Code.
-jpg.jpeg)
-
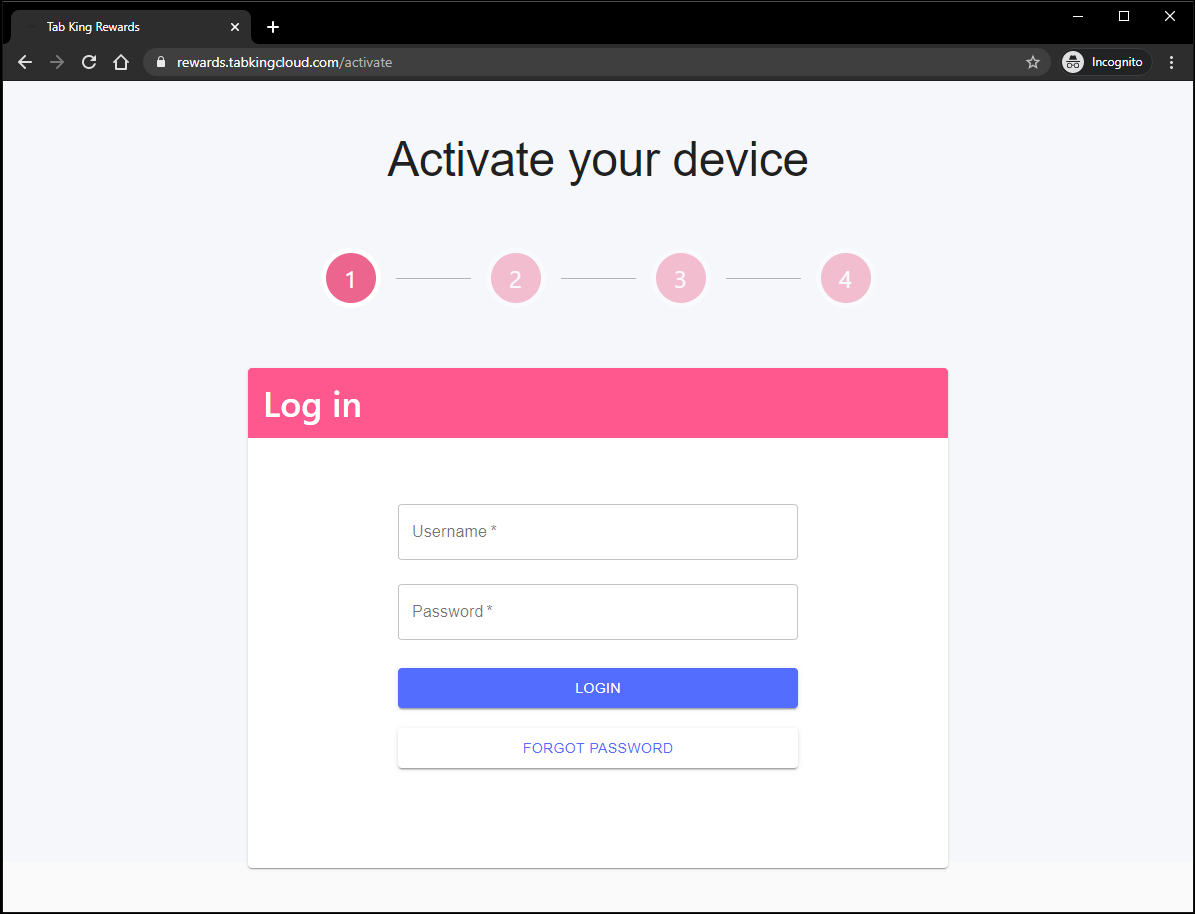
Go to www.tabkingusa.com/activate and log in using your Tab King Rewards username and password. NOTE: You must already have an active Tab King Rewards account to register a Rewards Kiosk app.
-
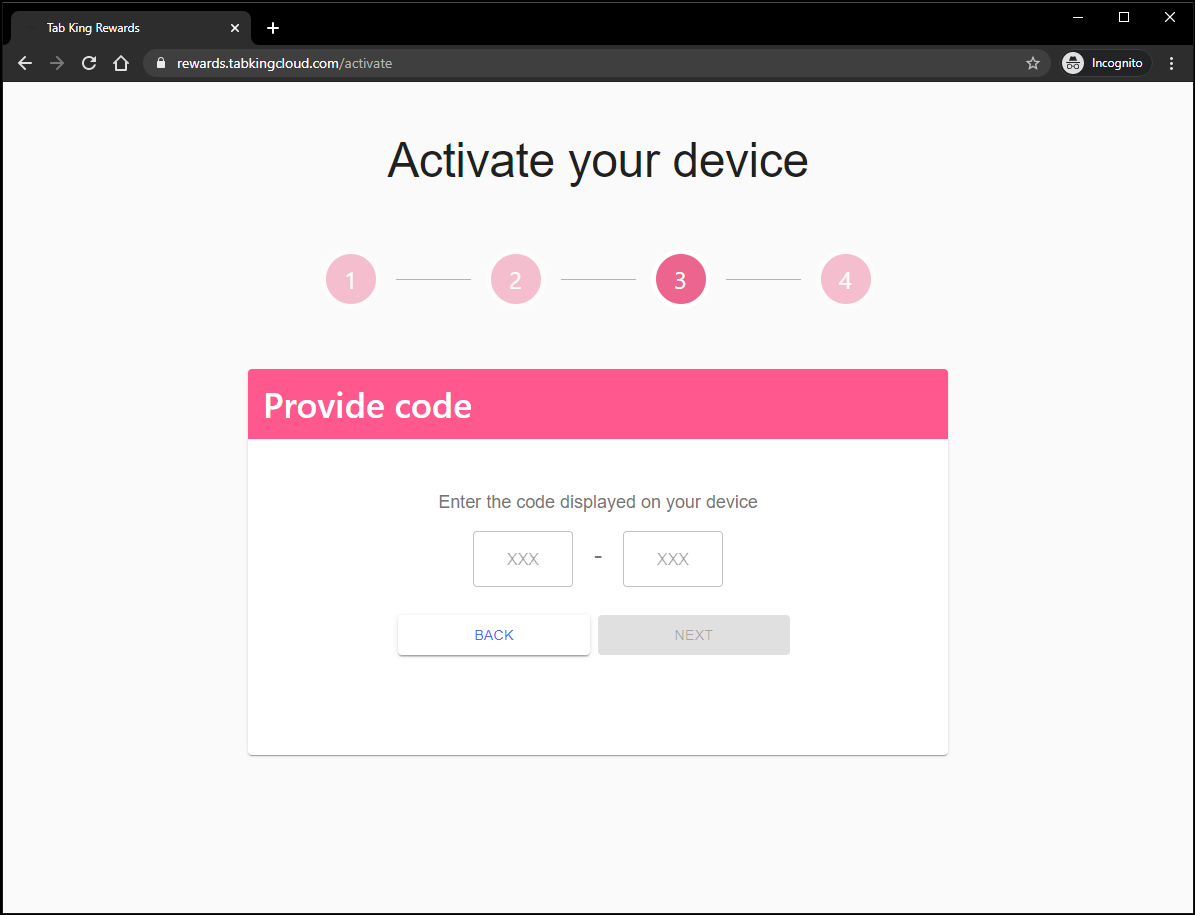
Enter the Activation Code displayed on your Reward Kiosk App.
-
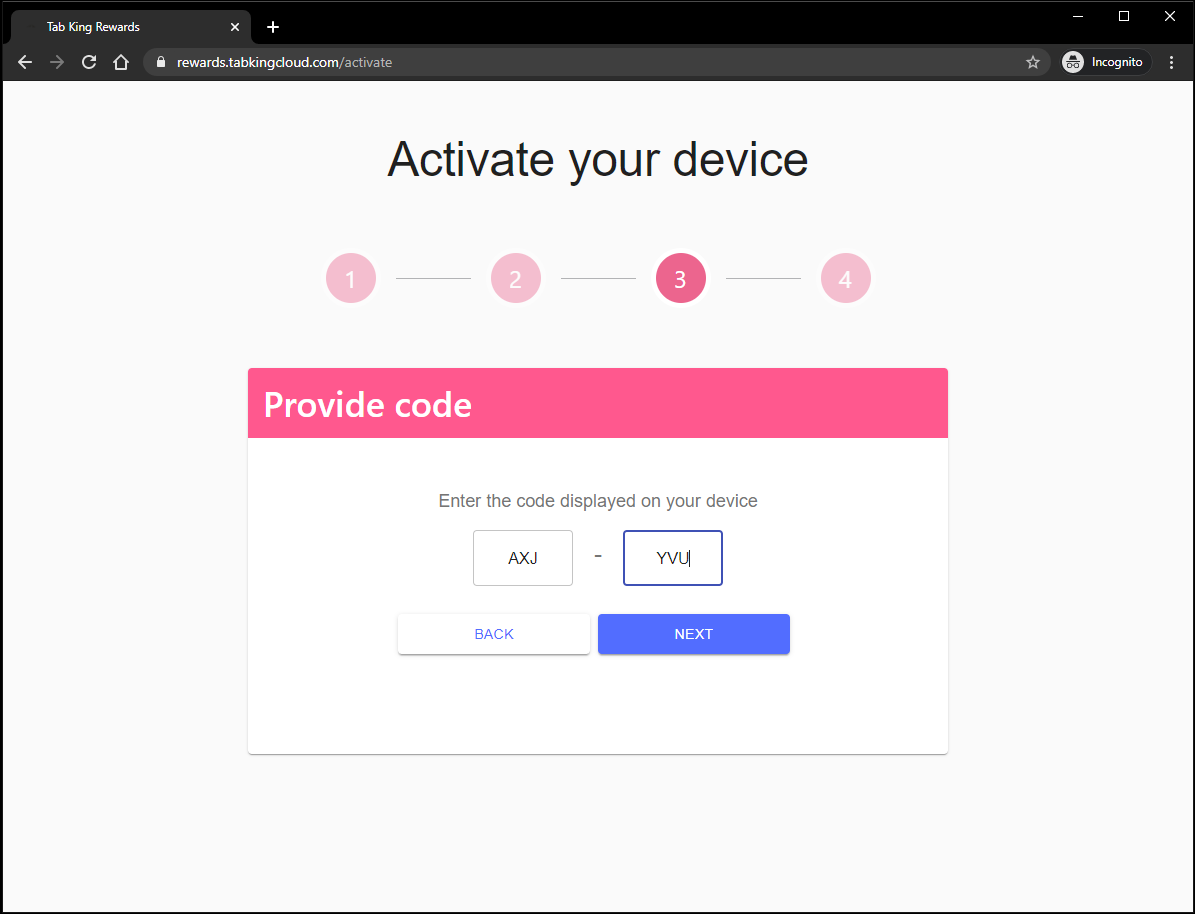
Confirm your Activation Code is entered correctly and select the "NEXT" button to complete your Tab King Rewards Kiosk app activation.
-
Customize the name of your Rewards Kiosk to make it easier to manage multiple kiosks. Example: "Front Door Rewards Kiosk" or "Main Bar Rewards Kiosk". Select the "FINISH" button to complete your Rewards Kiosk registration and activation.

-
The Rewards Kiosk Activation and Registration is now complete. Select the "TAKE ME TO DEVICE LIST" button to navigate to the Rewards Admin Portal or close the Window.

-
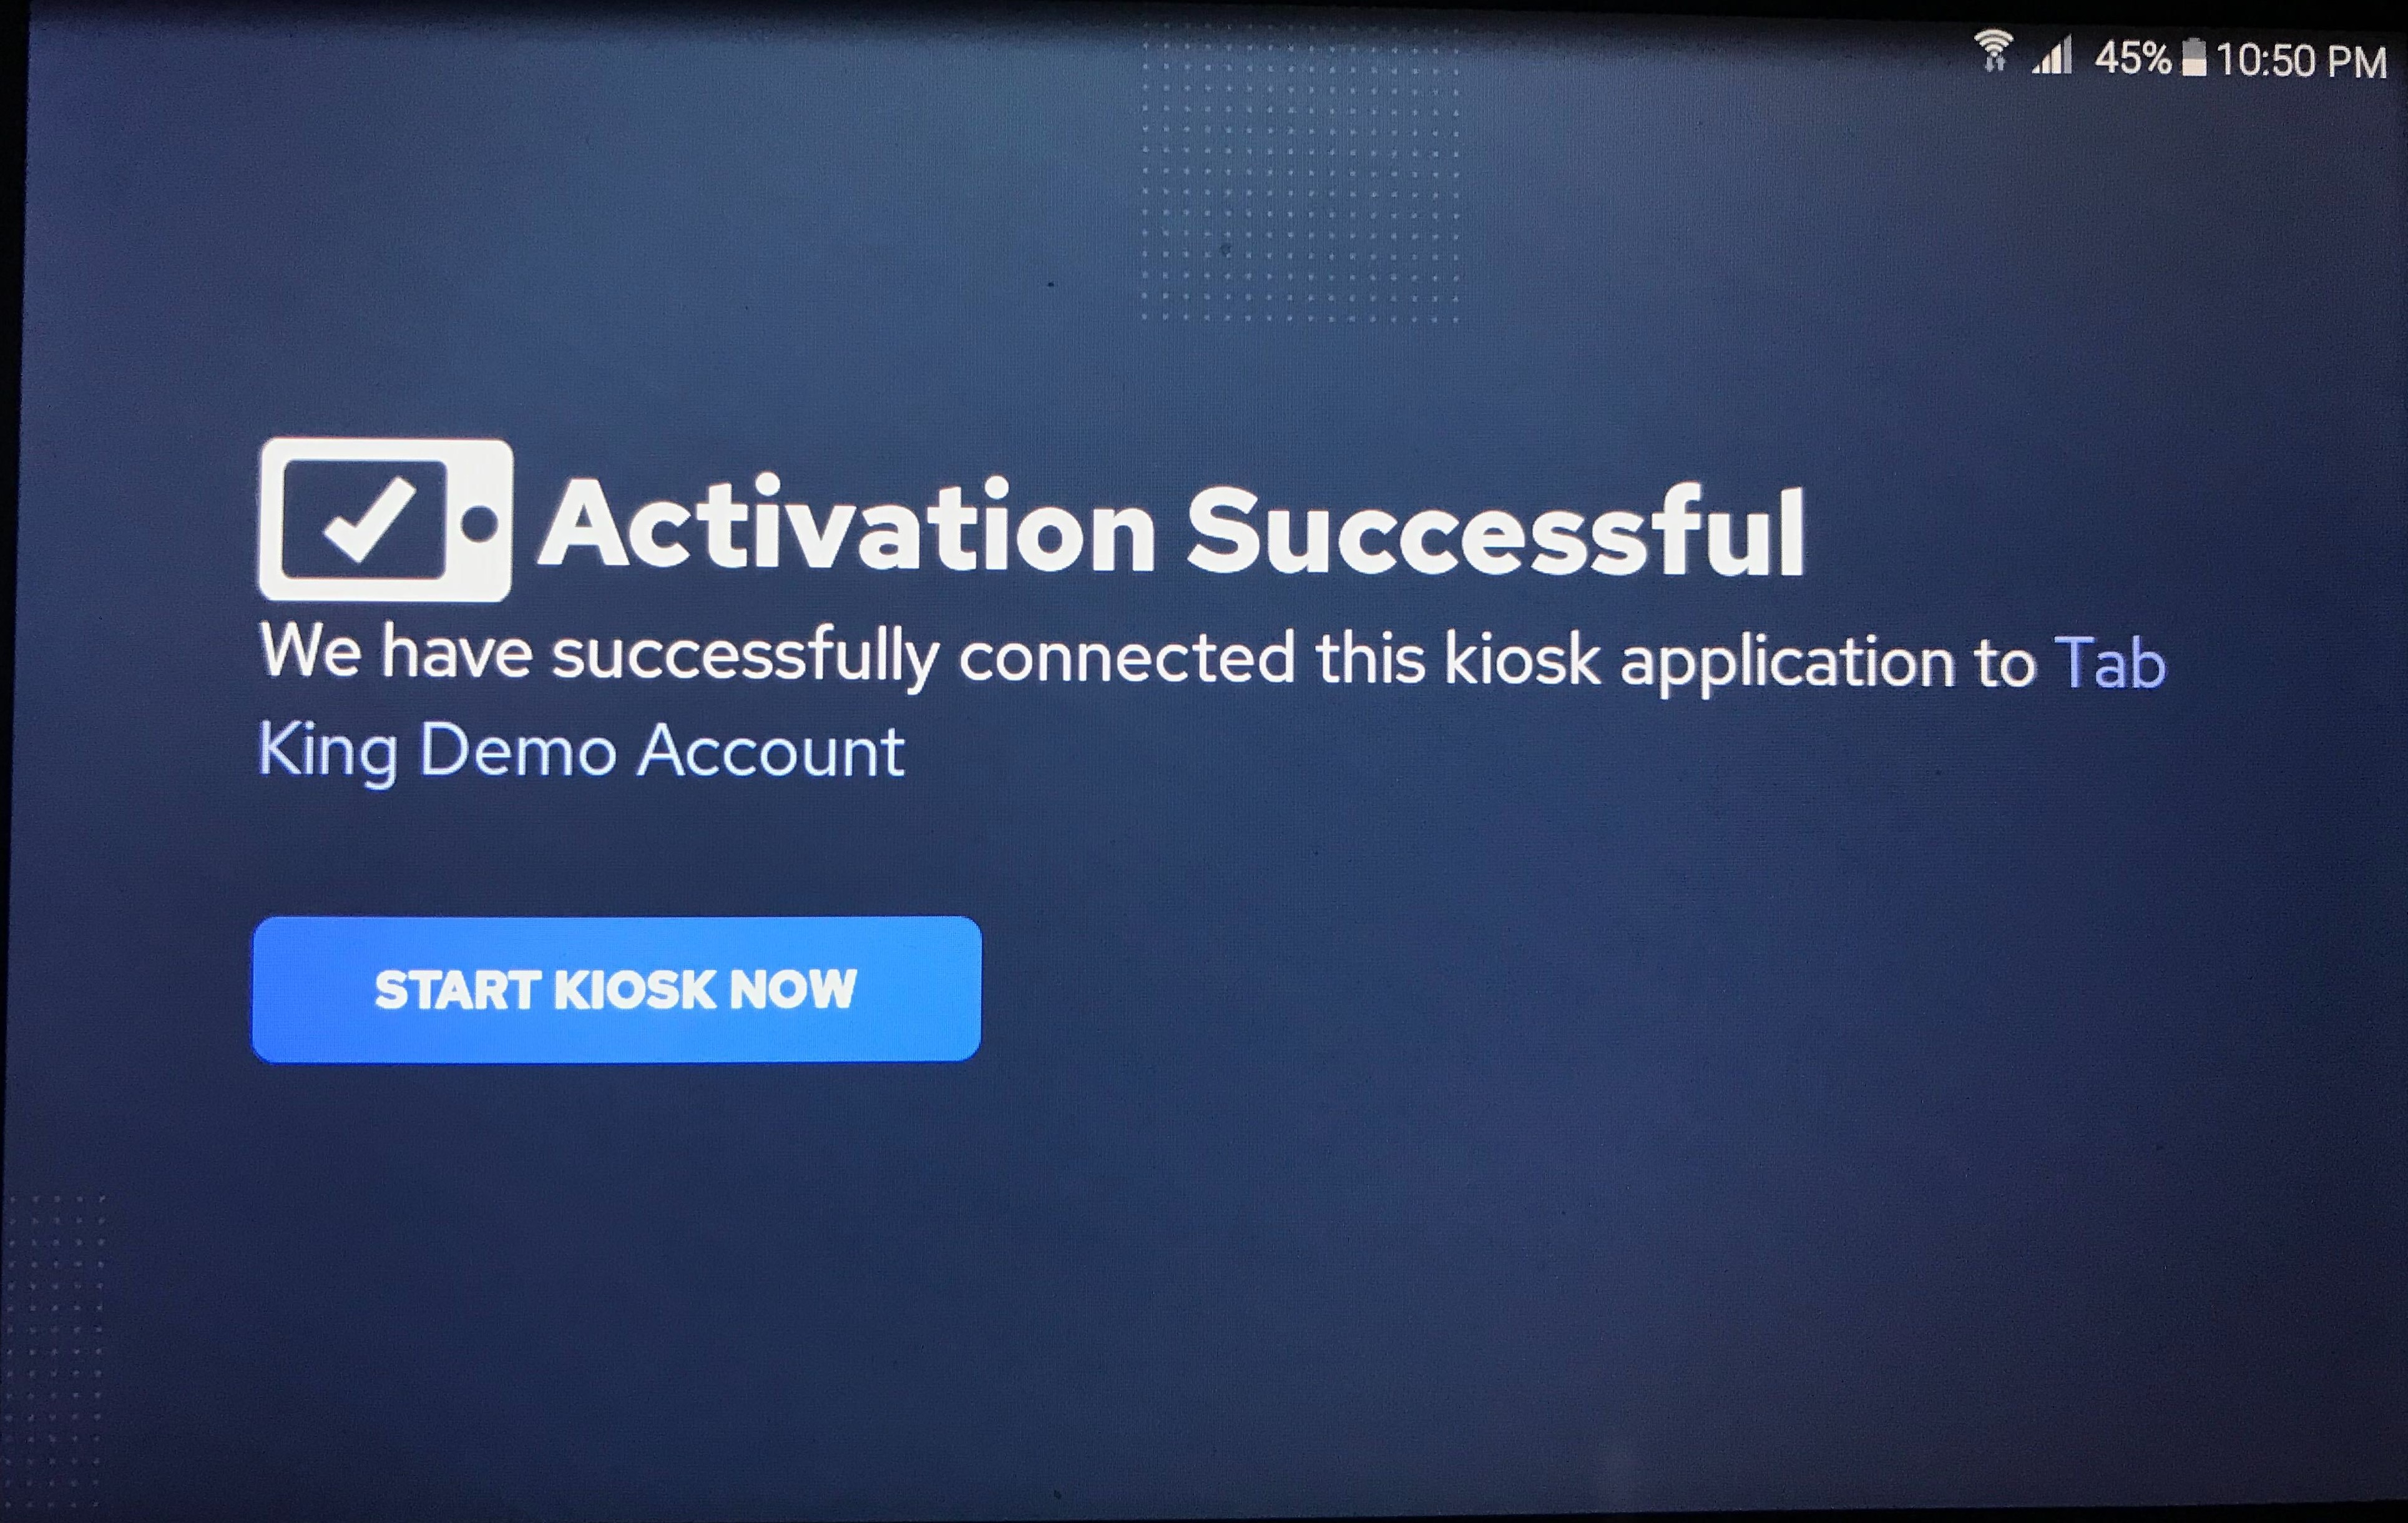
Back on your Rewards Kiosk, the screen will automatically update that the activation process was completed successfully. Select the "START KIOSK NOW" to start using your new Tab King Rewards Kiosk.
For more details please see: Register and Activate A Rewards Kiosk
Check Out our Knowledgebase (Tab King Help Center)
Congratulations, you've made it through the Free Trial Guide.
We understand there is still a lot to learn. While you continue your Trial, be sure to check out the Tab King Help Center at help.tabkingusa.com/knowledge.